Rescuing Our Pit Bull, Dakota

I have always wanted a dog. It was one thing my parents did not give into during my childhood and I never quite got over it. When Louis and I bought a house two years ago, I decided it was finally time to start looking for a dog. Neither Louis or I have ever owned a pet before, the same excuses my parents gave me years ago plagued my thoughts. Are we capable of training it? Do we have enough time for it? What do we do with the dog when we travel? What kind of dog would we even pick?

To start the process, we made a list of things we wanted in a dog

  1. We wanted a mid to large size dog, he/she would need to be able to keep up with our active life style
  2. We wanted to rescue a dog instead of purchasing a puppy
  3. We wanted a dog around 2 years old. This way they are full grown, house trained and are lower maintenance than puppies.

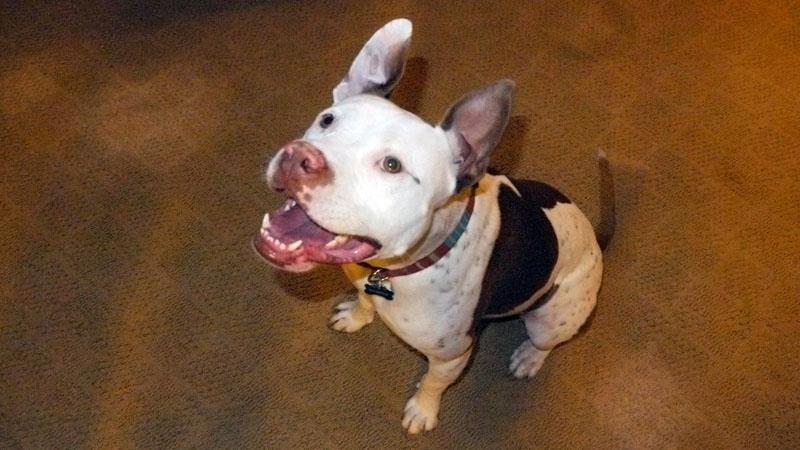
It was intimidating visiting some of the local shelters at first. Most of the  dogs had a lot of pent up energy which can be easily interpreted as aggressive behavior for an inexperienced person. In the end, we couldn’t commit to any of the dogs we saw and gave up the search while I took a month off traveling Southeast Asia. I found Dakota at an adoption event while passing by Petsmart shortly after I returned from my trip. We had our eye on other dogs but did not notice Dakota sitting patiently in the corner. When a volunteer at the adoption fair found out we were first time pet owners, he introduced us to Dakota. Dakota is an American Staffordshire Pit Bull and he described her as a great dog for a first time dog owner. Of all the dogs we’ve met in the past months, Dakota was the most docile, well socialized and responsive dog we’ve met.  After spending a few minutes with her, we were in love.

It’s almost been a year since we rescued Dakota and we are so thankful for all the happiness she’s brought into our lives. As lucky as we got with Dakota, we’ve learned a few useful tips that we want to share with first time dog owners.

  1. Know what you want in a dog. The easiest way to do this is to make a list similar to the one we made above and stick to it. Be logical about your choices, ask yourself is this a good fit? Bring a friend you trust if you don’t think you will be capable of making a rational decision! Remember, once you rescue, you are committed to this dog for the rest of their life, it is your responsibility to take care of this dog.
  2. Private shelters are great places to find the right dog. I found pounds to be intimidating places for the inexperienced dog owners. Private shelters usually rescue highly adoptable dogs from pounds and has better resources (i.e. foster homes, training classes, etc.) to keep these dogs happy. Their adoption fees are usually more expensive than the local pound, this is because they provide the dogs with so much more. When we met Dakota, she was well socialized and exercised because she lived with a foster family at the time of the adoption. This made it easy to see what type of personality she had right away.
  3. Sign your dog up for obedience training classes. The more well behaved your dog is, the easier it will be to find dog sitters when you leave town!
  4. Surround yourself with dog owners or dog lovers. These are the people who will be willing to watch your dog for you when you leave for vacation. Dakota is such a well behaved dog, it’s very easy for us to find her a place to stay when we leave town.

Pit bull

MYOG: Fire Starters On The Cheap

Quick and Dirty
Cost: $
Time: 30 minutes
Difficulty (1-10): 1

Below is a quick and easy tutorial on how to take dryer lint and turn it into an effective fire starter.  We use these on all of our back country trips that allow fires.

DSC_0186

What You Need
Lint from a dryer
Old candles, used candles, or residual wax
Heating device (heat gun, candle warmer, fire!)
Knife

Step 1

Wash your clothes and throw them in the dryer.  Save the lint that’s collected in your dryer.

DSC_0193

Step 2

If using long candles, cut them into bits and pieces for easy melting.

DSC_0198

Step 3

Put pieces in a heat resistent bowl that you don’t mind not using ever again.  I made a bowl out of tin foil.

DSC_0209

Step 4

Use a candle warmer or some type of heating device to melt some UNSCENTED candles. It’s very important to use unscented candles in the backcountry.

DSC_0205

Step 5

Form a ball with the dryer lint.

DSC_0211

DSC_0213

Step 6

Submerge HALF of the lint ball into the melted wax. The uncovered half of the lint ball acts as a candle wick and will burn faster.

Firestarters

Step 7

Pull them out and let them cool and harden.

DSC_0224

Step 8

To correctly light the fire starters, you need to stack small sticks and kindling above the fire starter.  Light the exposed portion of the fire starter.  Making sure there is enough oxygen to feed the fire, allow it to burn and melt portions of the wax until your kindling and sticks catch fire.

These dryer lint balls are easy to make, light weight and cost virtually nothing. On a cold wet morning, a nice warm fire will make a huge difference.  There are other options (newspaper, saw dust, etc.), but lint is FREE and easier to work with.

Final note:  I highly recommend  using unscented candles.  We use whatever we have left over, but we prefer to use unscented, inexpensive stick candles.  They typically cost a dollar for8 at the local dollar store – of if you are like us, you have a bunch of them around the house.

Gear Overview: LiteTrail Titanium Cook System

Quick and Dirty
Gear Type: Stove/Cook System
Fuel Type: Esbit Solid Fuel Cubes
Material: Titanium
Trail weight: 3.50 oz
Price: $89.95
Link:  LiteTrail Titanium Cook System (2013)
Pros: Light, Compact, Simple, Reliable, and Versatile.
Cons: Esbit stinks, leaves residue on your pot, line locks snap.

LiteTrail Stove

Continue reading

Camping/Backpacking Tips: The Little Things That Can Make a Big Difference

A mutual friend of ours introduced us to backcountry camping years ago. We set out on our first backpacking trip with borrowed gear. We completed the trip with painful blisters on our feet and loved every moment of it. Since then, we’ve spent every weekend available exploring the outdoors through back-country camping. Along the way we’ve learned a few things that have made a big difference for us, hopefully these tips will do the same for you.

Bring Fire Starters  

Assuming you have the right gear, sleeping through a rain storm while camping outdoors can be quite a soothing experience. Unfortunately when it comes to time to leave your tent the next morning, starting a fire with wet wood and frozen fingers is no fun, not to mention nearly impossible. Louis and I learned this the hard way. We had slept through a rain storm the previous night and woke up the next morning refreshed and ready for some hot breakfast next to a warm camp fire. After twenty minutes of failed attempts to start a campfire with moist tinder, we were ready to give in to our hunger. Luckily, a seasoned backpacker came to our rescue with a handy fire starter.

Being new at backpacking, Louis and I consoled ourselves on this little oversight and vowed to never forget to bring fire starters, we really love our morning camp fires.  We will be posting a Make Your Own Gear (MYOG) post in the future on how to make our fire starters.

Make sure to take into account elevation when planning a back country trip 

This is a problem we often run into at the beginning of backpacking season in spring or even early summer. Personally, I blame the perfect Pacific Coastal weather in Orange County! 😉  Last spring, Louis and his friends decided to backpack Mt. San Gorgonio (San Bernardino National Forest) in mid April. The weather in Orange County that week was in the mid 70s, the boys did their due diligence and called the ranger to inquire about the trail condition. They were told by the ranger that the trails were in great condition,unfortunately for them, this turned out to be the incorrect information. At mile 2 they ran into ankle deep to knee deep snow. With no snow shoes and lack of proper winter gear (two of the boys were wearing shorts!) they headed back down the mountain after completely losing sight of the trail 7 miles in. Lessons learned from this trip, don’t always trust the park ranger (see below), check the snow reports and read online blogs or forums to check real time trail conditions.

Don’t just rely on the park ranger

Don’t get me wrong, most of the park rangers we’ve met while hiking/camping are very helpful and knowledgeable. Most of the time, the more popular the trail or park is, the more knowledgeable the rangers are. We do most of our weekend backpacking in Los Padres National Forest in Southern California. And every year, there is one ranger there that ALWAYS provide us with false information about the availability of water and trail condition. I don’t think he means to but it’s starting to get REALLY annoying. The two most frequent questions we ask the ranger are 1.) is there snow on the trail 2.) where are the stream crossing locations for water. Unfortunately, we’ve been given unrealistic answers to both questions on various occasions. It’s important in the backcountry to know where your water sources are to correctly ration water for the duration of the trip because ending your day thirsty is no fun. As always, in addition to talking to your park ranger,try to find online real time trail conditions and be sure to read log books in the beginning of the trail when available, they can be very useful!

Helpful links for to check for trail conditions at Los Padres National Forest:

http://www.ventanawild.org (Northern Los Padres National Forest, Big Sur Region)

http://prdp2fs.ess.usda.gov/alerts/lpnf/alerts-notices/?aid=10432 (Los Padres National Forest road closure and conditions)

Bring an extra shirt for the car ride home

Sure, after a couple days in the wilderness you and your travel companions will smell the same. But if you are like us, we usually indulge ourselves with delicious food immediately after leaving the campsite. Leave a clean shirt in the car for the restaurant, trust me, people at the restaurant will thank you for it.

We’d love to hear tips and tracks you have when camping out in the wilderness!

Ciudad de Mexico – Part 6 – Traveler’s Diarrhea

We’ve heard about it, prepared for it on most trips, but have been lucky enough to avoid it until Mexico City. It was caused by our fascination with street foods, the better the food is, the bolder we get.  Cooked foods and beer are usually safe, but beware of raw vegetables that are usually accompanied by soups or ice in drinks.  I usually try to stay away from uncooked foods for the first couple days when visiting a new country, as I become more attuned with their food, I start becoming more adventurous.

Traveler’s diarrhea usually starts with a slight discomfort, then the stomach cramping starts, many times the cramping will become unbearable and looking for the nearest bathroom becomes your number one priority. I know this is not a sexy topic to talk about but it is very important to let your travel companions know you are feeling under the weather. Ignoring the symptoms can become very unpleasant when it can be easily cured by some antibiotics. Cipro is usually the antibiotics we bring with us when we travel, they are also obtainable for 5 dollars without a doctor’s prescription in Mexico.

Lisa was the first one that came down with travelers diarrhea on our second day in Puebla. Like a trooper, she tackled the pyramids of Cholula without any antibiotics. Louis became the second victim to come down with traveler’s diarrhea. Luckily, he was able to get it out of his system after a handful of trips to the bathroom that morning.